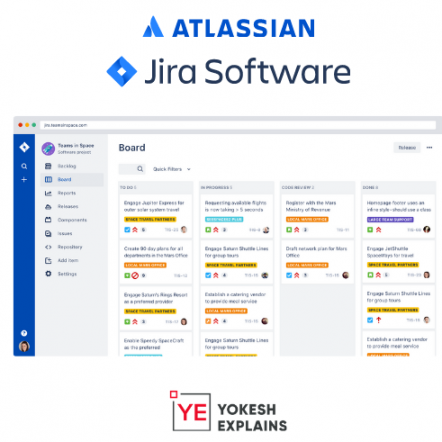
JIRA is a product of Atlasian and one of the widely used Project Management Tool across multiple industries. Being a Project Manager or Developer it is much required for you to know the basics of JIRA and how effective it can be for project management. Being a Project Manager myself, I would like to share my experience with JIRA and how we started adopting it in Sparkout Tech.
From my experience, I would say that the core advantages of JIRA are
- Developers get a complete knowledge of the project modules/components. As we can split the project into components and create tasks for each feature to be developed, it makes it easier for the developer to track the progress and be ready with the next tasks to be done.
- Easy for project tracking. As a project manager I create tasks and move them to “Selected for development” based on priority. Developers look into this selected for development section and work based on the prioritized ones.
- Differentiate between Tasks and Bugs easily while creating. Once created a Badge occurs with Task or Bug which notifies the developer.
- Connect with multiple third parties which we use during the project development. Example – Github for code repository, Zeplin for designs management.
Lets get started:
1) Register on https://id.atlassian.com/signup
2) Login with your credentials
3) You will be redirected to your projects dashboard. (I have few ongoing projects already)

4) Creating your first project on JIRA
Click on “Create Project” button on the Projects Dashboard. You will be redirected to choose product type screen
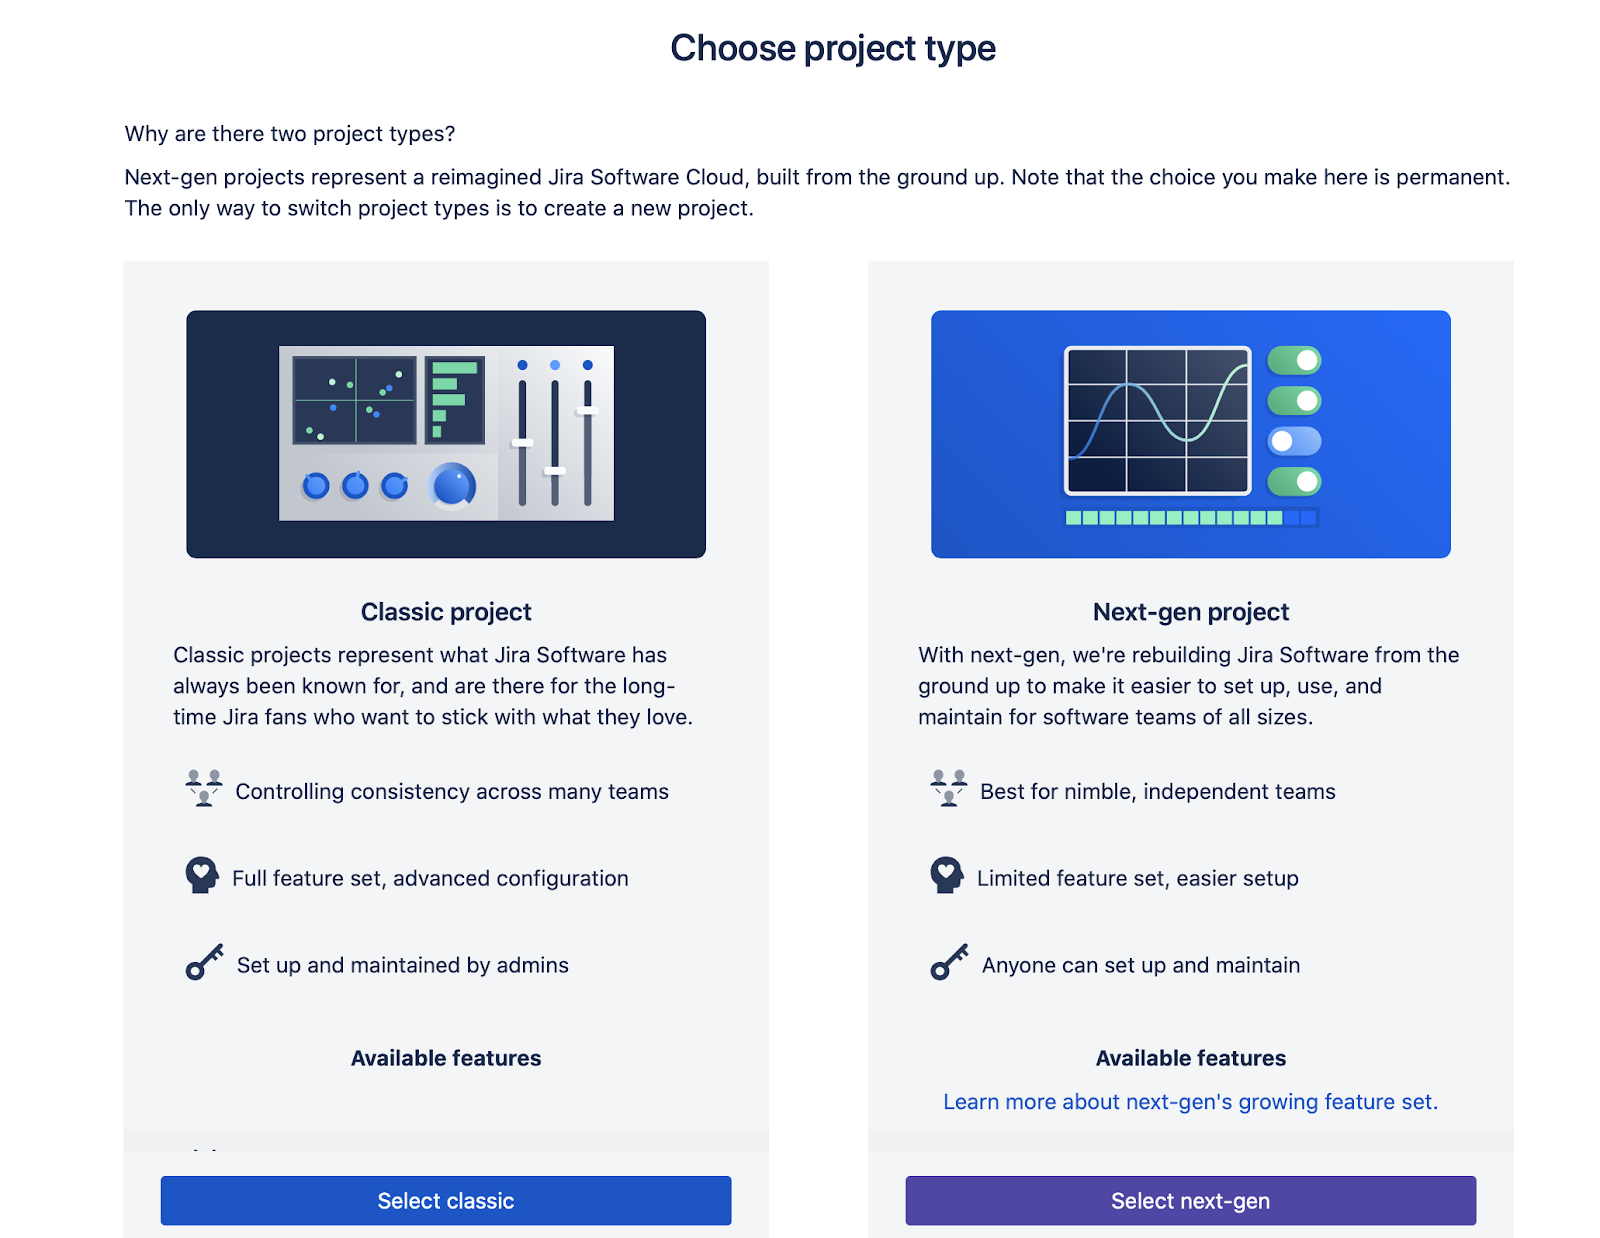
As this is our first project tutorial, let’s go with Classic project. For a basic new project, classic type should cover the required features.
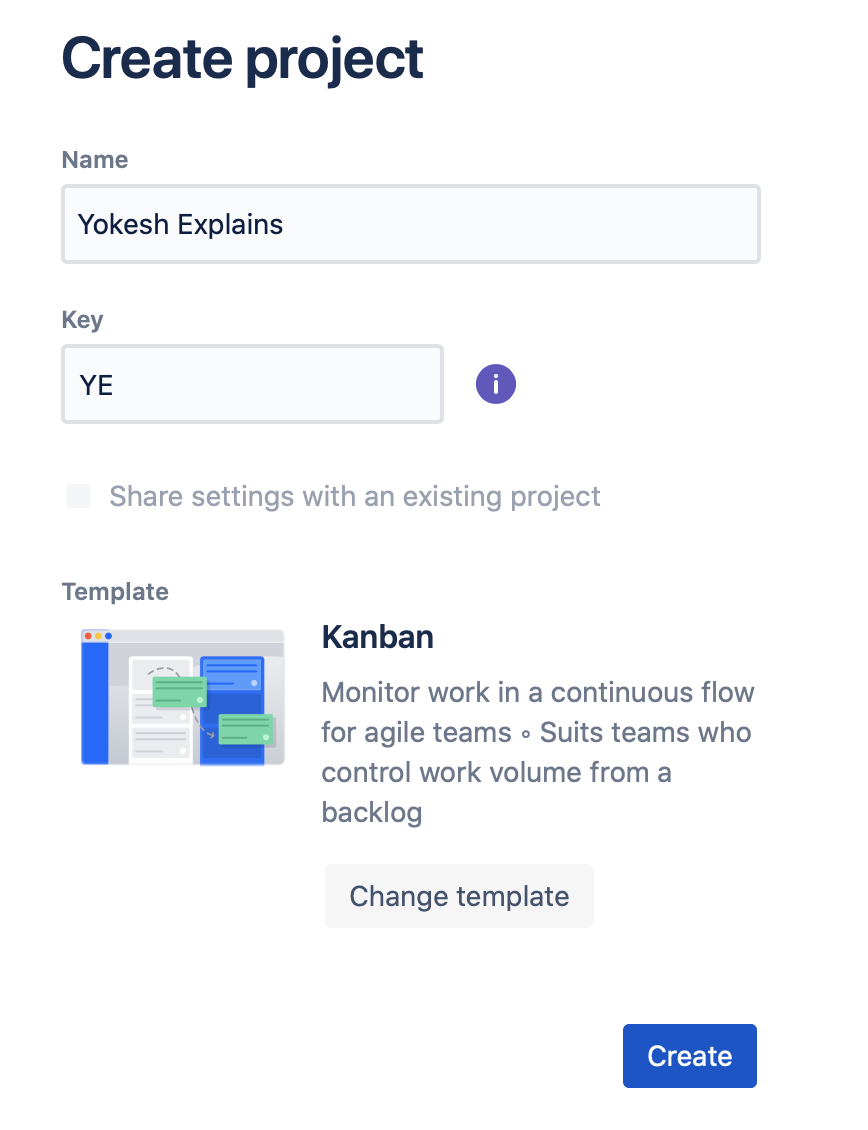
5) On the next step Atlasian JIRA will ask for the project name, key and project template. Key is the unique identifier serial number which will be helpful for tracking issues/Tasks created. For example: Here I have given YE as the key. Whenever I create an issue, the serial number keeps incrementing YE-1, YE-2 and so on.
6) Choosing your project template:
For software developments, you have 3 types of Templates
- Kanban
- Scrum
- Bug Tracking
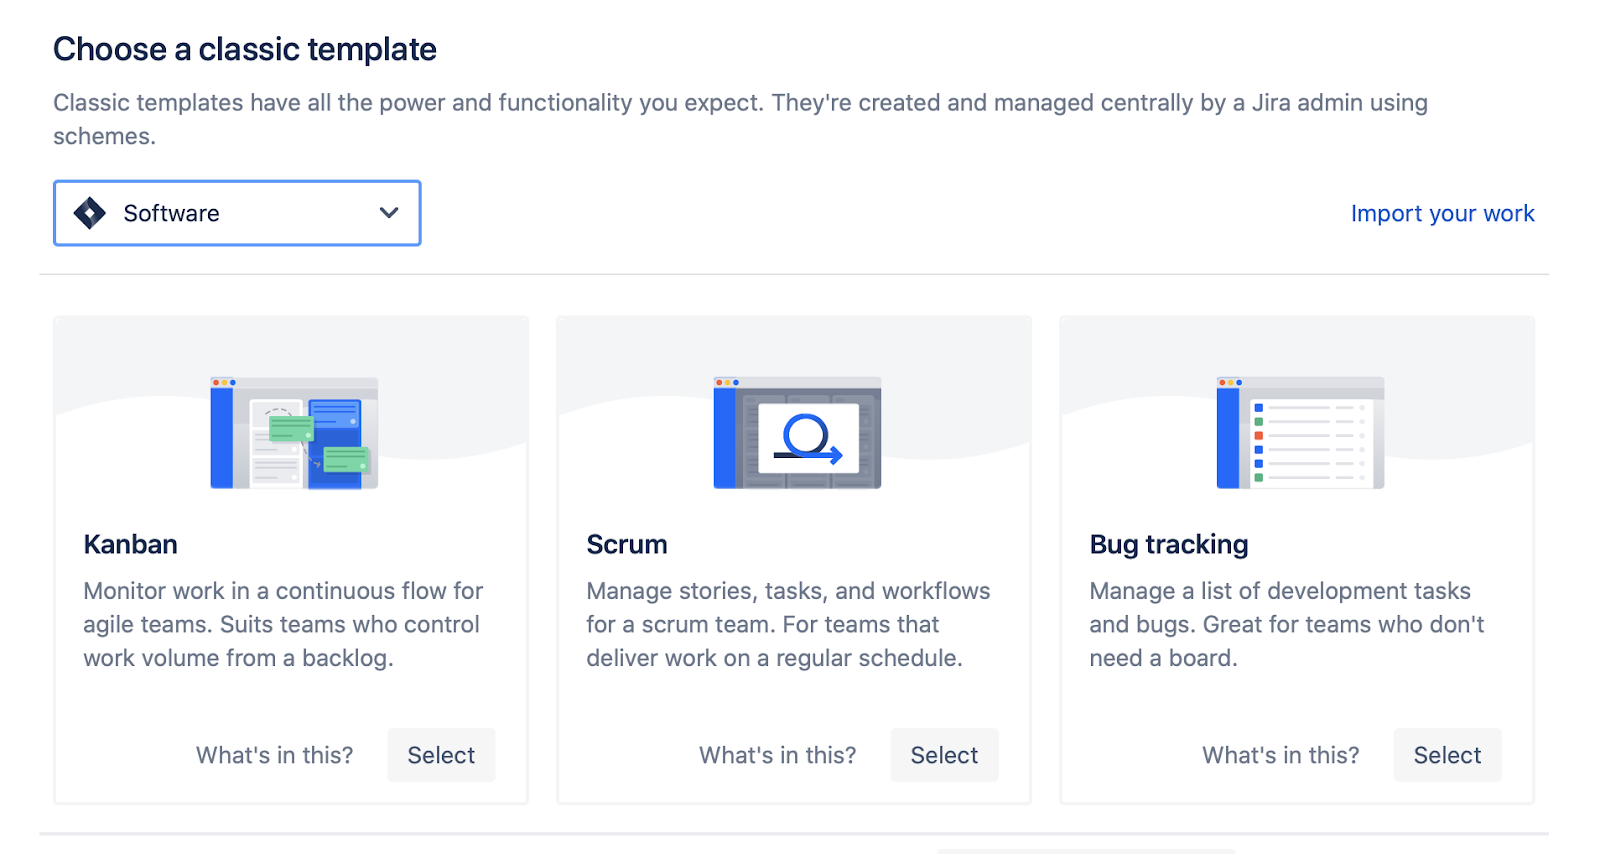
Kanban
Kanban is suitable for waterfall model projects where you have your complete project requirements and user stories ready on hand. You can set up the tasks in backlogs, assign to a team or developer and track them easily.
Scrum
Scrum is suitable for Agile project development where you have sprint plans either to deliver weekly or biweekly and when requirement changes on the project go. A set of work is prioritized for each sprint and the team concentrates on it. Only once after a sprint is completed, the team moves to the next sprint. Usually while using a Scrum type project development teams conduct sprint planning, sprint review, retrospective meetings and daily stand ups to keep team focused on the sprint goals.
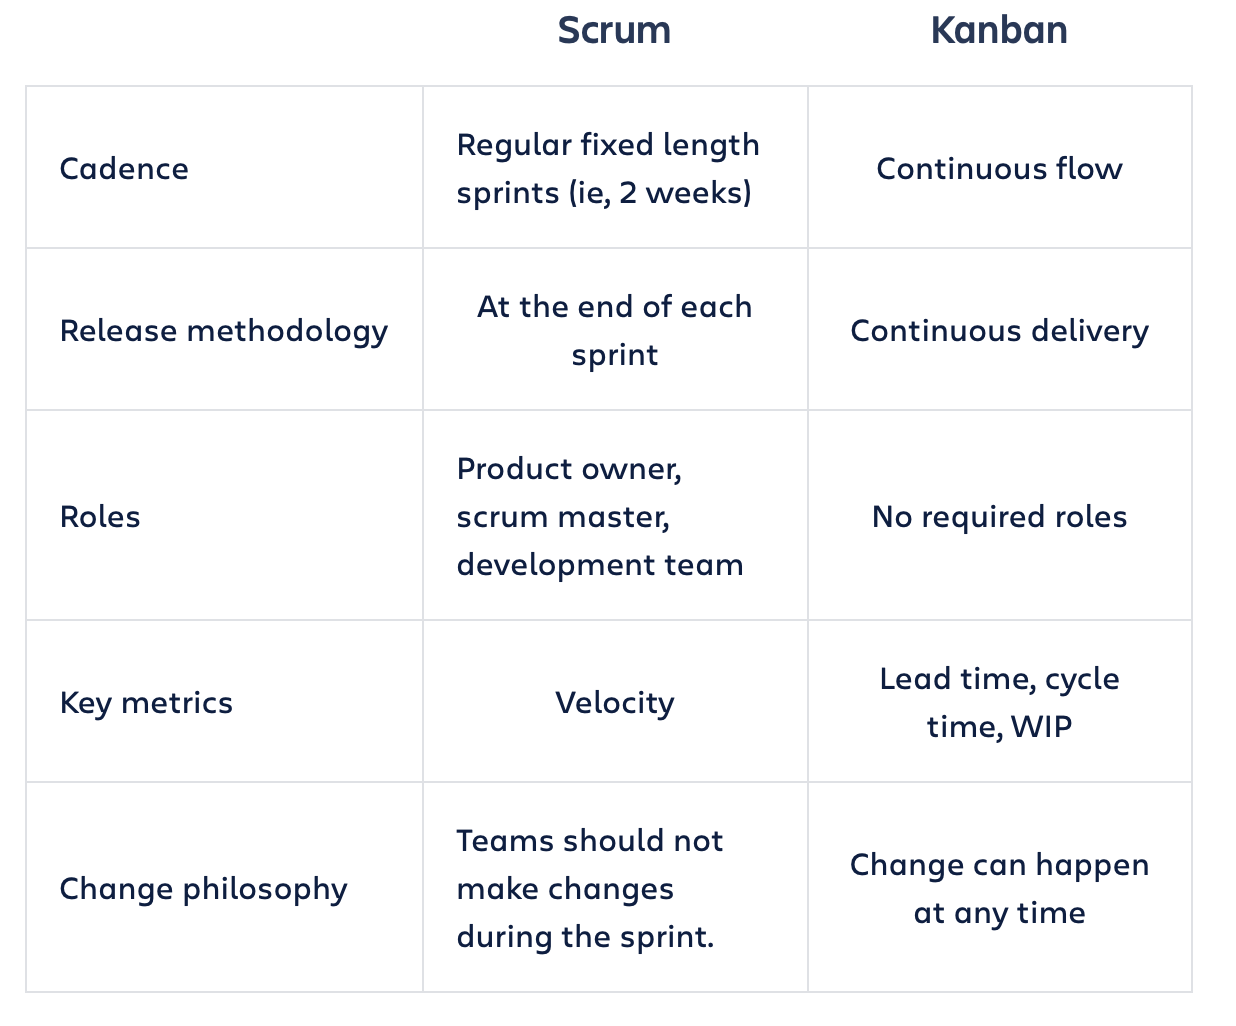
Source: Atlassian JIRA.
Bug Tracking
Bug tracking template is suitable if your project development is almost complete and the QA team takes over for testing. They list the bugs and assign it to the specific developer.
In this example, I am choosing a Kanban type template and finally I am creating the new project.
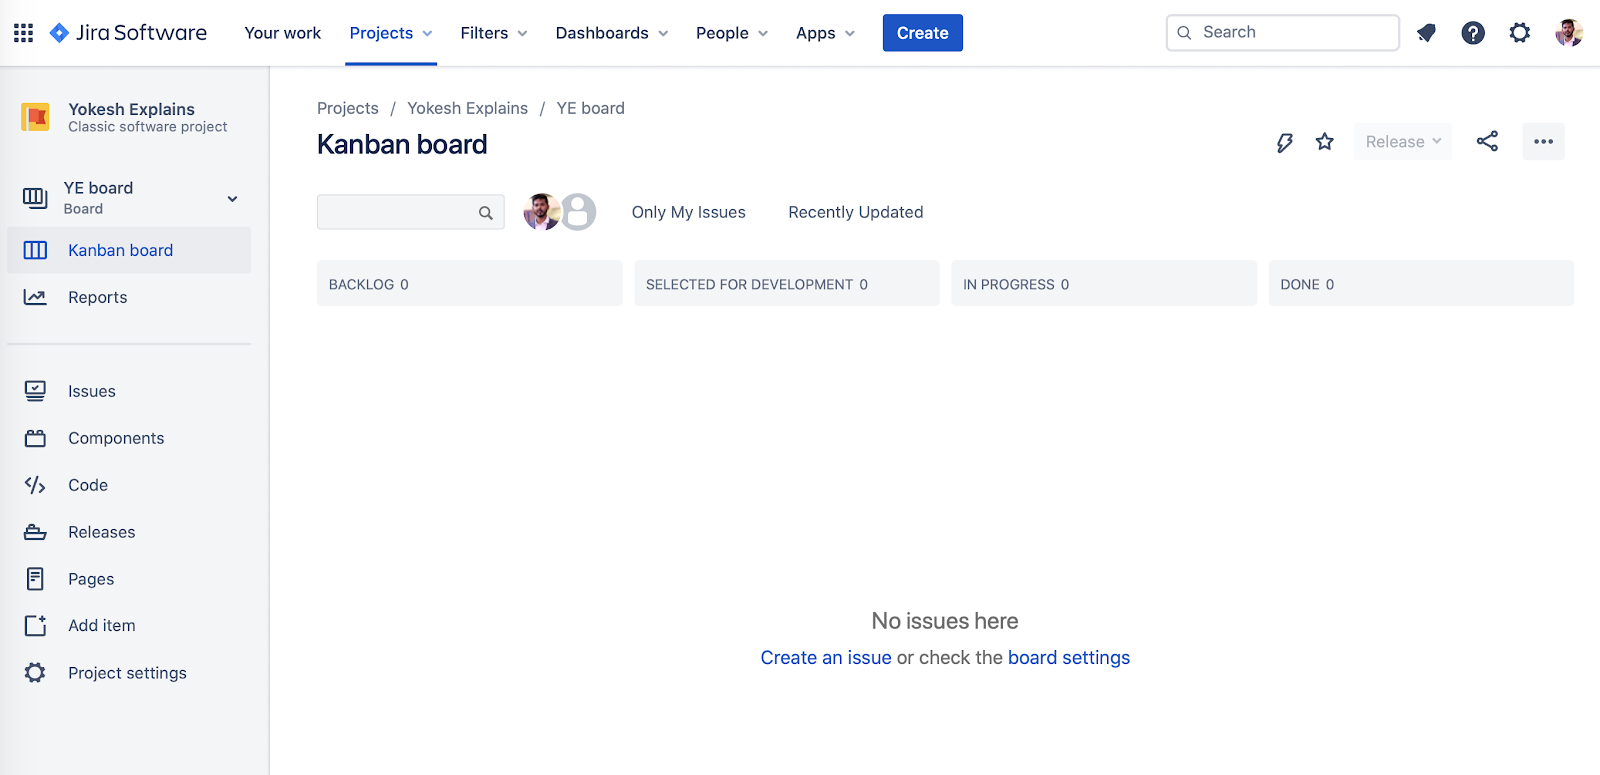
7) Inside Project Dashboard
Once after creating, you will be redirected to the project dashboard. As you see in the image below, you will have 4 columns created by default – backlogs, selected for development, in progress, done.
For more flexibility on the board, I recommend you to move out the Backlog column out of the kanban board to your left menu section. This gives you more room inside the board. To do the same, got board settings option under the top three dots icon. Then select “Columns” menu. You will see the below options:

Now drag and drop the Backlog square to the left section. Once done, the backlogs column will be taken out of the board to the left menu. You also have the options to add new status and new columns inside the dashboard.
8) Creating your first Task in JIRA
On the top menu you will see the option to create a task/issue. Once you click on it you will see a popup to enter the task details.
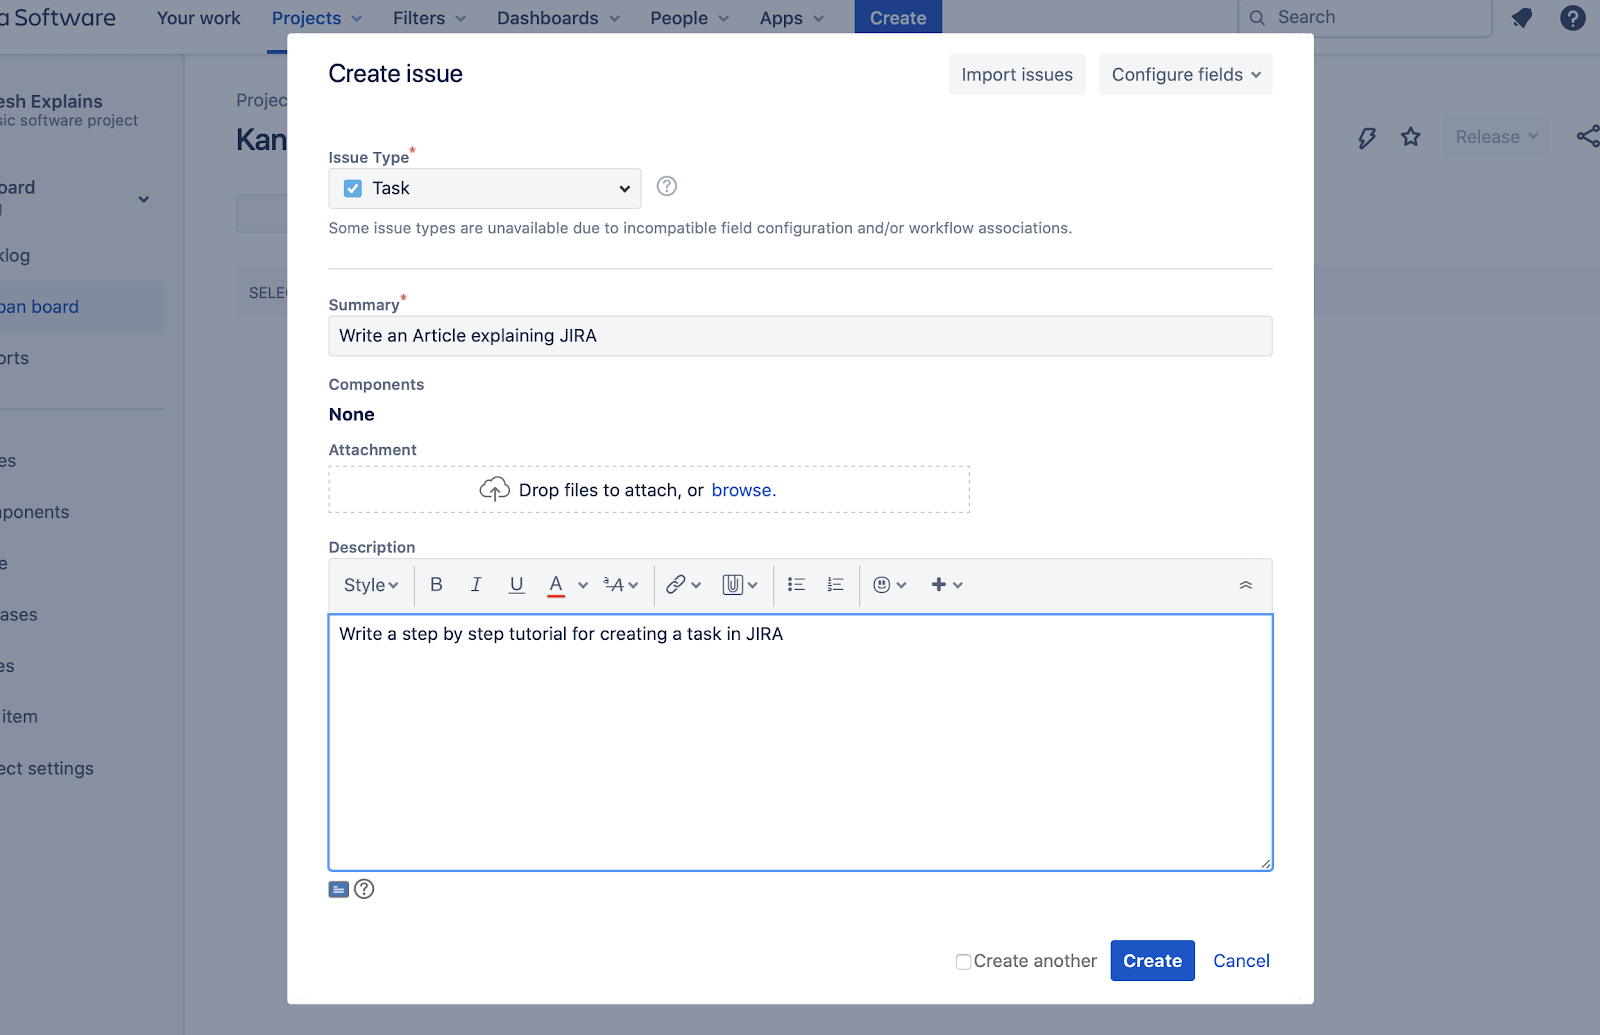
Choose the issue type as a task. Write down the summary and description for the task. You also have an option to attach an image with the task. Once done, click create. Awesome, you have created your first task ticket/card in JIRA!
As we have moved out the backlog column, click on the Backlog option and you will see the task created there.
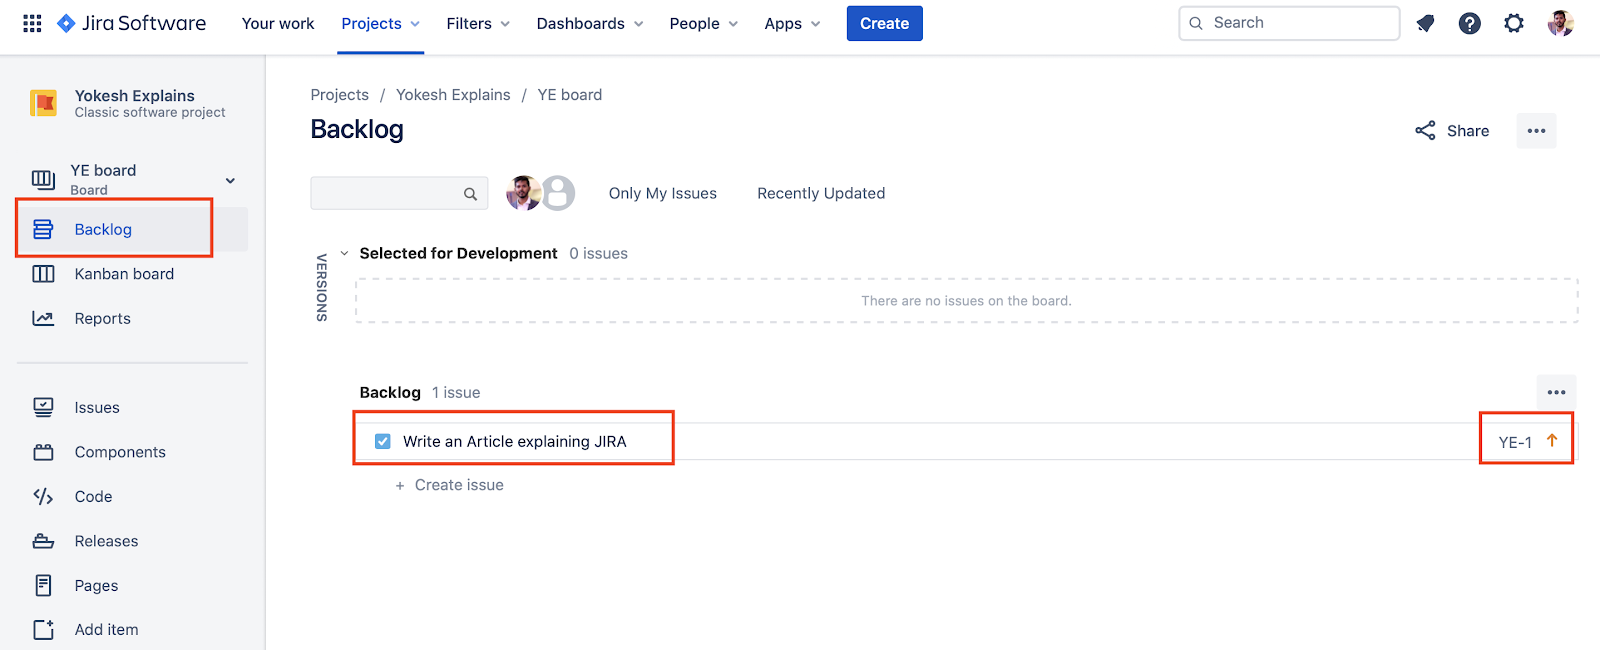
Note the Key for the task : YE -1
Similarly, you can keep adding your tasks one by one in the backlog.
9) Usage of Labels and Components in JIRA
Labels are just like tags. You can add tags like #android, #ios, #backend which will be helpful for sorting and searching all issues under one tag.
Components is another additional way to categorize issues. You can split your projects into components like User Management, Product Listing, Cart/Checkout, Payment and list down all the tasks and issues under it. Components helpful when developers work on tasks module wise. Components in JIRA are also helpful in sorting and searching.
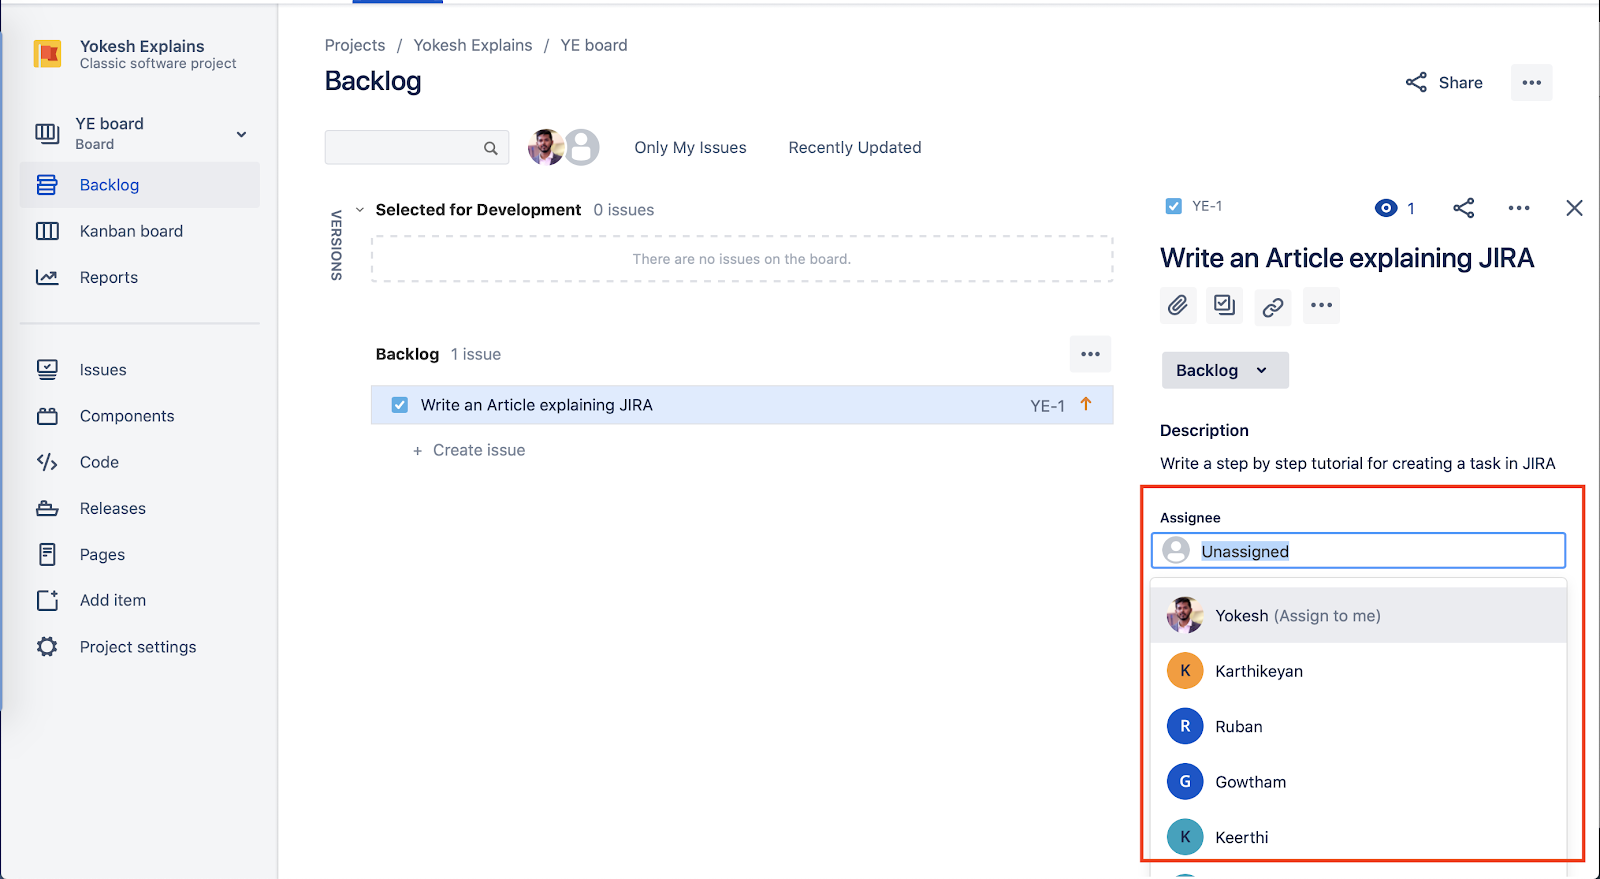
10) Assigning Issues to team
As you create a task/issue you can assign it to a developer. To do the same click on the issue and you will see an option “Assignee” which will be “Unassigned” by default. Click on it and you will have a list of team members to assign.
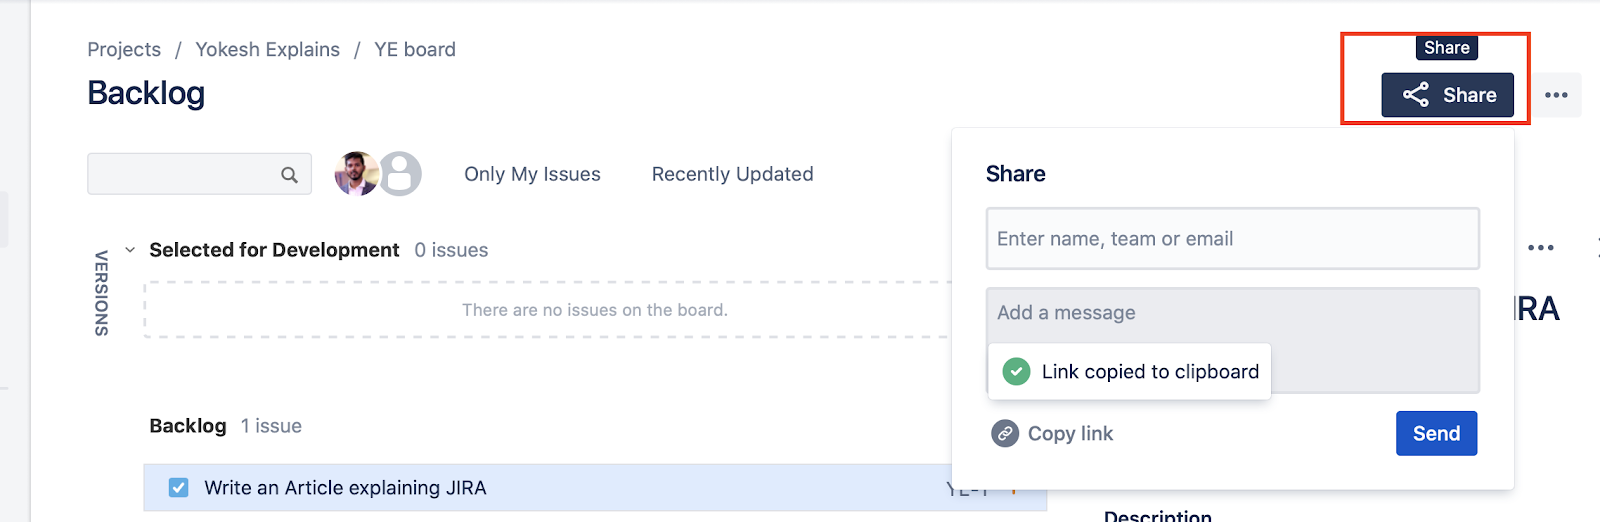
Note – Make sure you have team members invited to your JIRA board. On the top right you will see a “Share” button to invite them via mail or share a link to join directly.
11) Update Status or Move Cards in JIRA
As a task is completed, it can be moved from one column to another. Once moved, you can set alerts and notifications for the same which will be helpful to notify the others in the team.

In this article i have covered up the Basics to get started with JIRA for project management. Let’s go a bit deeper in the upcoming articles. Comment your questions and thoughts below.


Nice one
[…] the overall project at the developer’s side and communicating with the client. Pricing for a project manager should be added as […]
I am really impressed with your writing skills
as well as with the layout on your weblog.
Is this a paid theme or did you customize it yourself?
Anyway keep up the nice quality writing, it is rare to see a great blog
like this one nowadays.